
Expert Tips and Mistakes to Avoid
For many do-it-yourself families, summer is wood floor sanding season. Add that to the long list of jobs like house painting, yard renovation, and paving projects. But why head indoors? It’s simple. You can turn off the air conditioning (assuming the house has it) and open the windows to ventilate during the dusty and smelly job of renovating a wood floor.
If you’re ready to take a crack at this job using rental floor sanding equipment, there are a few things to know so that you end up with a beautiful floor.
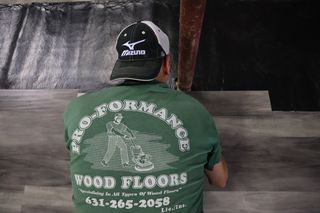
Below is a list of supplies followed by some helpful links. That’s followed by a list of pro-level tips courtesy of one of the most knowledgeable wood floor contractors we know, Joe Fenollol, who has sanded and refinished wood floors for the last 23 years as the owner of Pro-Formance Wood Floors on Long Island, New York (transparency: Joe is the father of Home Tech Editor Hunter Fenollol).
Floor Sanding Supplies
- Cartridge respirator: 3M 53P71
- N-95 dust mask: 3M 8511
- Safety glasses: Elvex SG-37C OVR
- Ear plugs: Elvex Ep-411
- 1-inch Scraper: Red Devil RDL3010
- Quarter-sheet sander: DeWalt DWE6411K
There are a variety of online resources that you should check out before beginning your first wood floor sanding job. For example, there’s this fine video from American Sanders, a manufacturer of floor sanding equipment. Also, have a look at the Sanding and Finishing of Hardwood Floors pdf (produced by the National Wood Flooring Association) and available at the website for City Floor Supply.
Hunter Fenollol
Sand Floors Like a Pro
There’s a lot of ways that a DIY floor sanding job can go wrong, and having seen a few of them, I can tell you that they are not easily corrected. But the thing that struck me most about talking to Joe Fenollol is that many of these rookie mistakes are pretty easy to avoid. Furthermore, like any endeavor, if you start right, you have a far better chance of completing the job correctly.
Ten Tips For A No-Fail Floor Job
1. Safety First
Everybody’s heard the admonition, “safety first.” But it was the first thing out of Joe Fenollol in my interview with him. “I know,” he said, “everybody’s heard it, but you have to pay attention to it. You’ve got to take care of yourself.” Sanding a floor is hard and hazardous work that generates loads of fine, respirable dust. Yes, sanding machines have dust bags and some machines are known as “dustless” because they attach to backpack vacuums the operator wears. But Fenollol cocks a wary eye. “They say they’re dustless, but the truth is that there really is no such thing as dustless floor sanding. Sure, some sanders do a better job than others of capturing dust, but you still need to wear a dust mask.” Fenollol wears a professional cartridge mask that protects against solid airborne particles and vapors produced by floor finishes.
But for a single floor sanding job, an N95 mask from a reputable manufacturer will work. And while you’re picking up safety supplies, get a pair of safety glasses, washable ear plugs, and high-quality knee pads.
Tom Messina
2. Search for Hardware
You’d be surprised what you find sticking out of a wood floor, from bent nails, to stubs of screws, to staples and remnants of carpet tack strips. “Give the floor a quick sweep with a broom, and also visually,” Fenollol says. “If you hit a piece of hardware, the sander will throw some sparks and you’ll instantly ruin a belt or disc. Given that these cost $6 or $7 a piece at a tool rental, that can quickly add up.” Avoid hitting hardware with a quick inspection followed by removal.
3. Search for Damage
“A wood floor might have anything from water stains, to termite holes, to a hole drilled by the cable TV guy,” Fenollol says. “You need to find these trouble spots before beginning the job because sanding alone can’t take care of them.” A cable TV hole might be easy to plug, but termite damage might require flooring replacement, he adds. Of course, blending a repair with its surroundings is tricky, and a first-time floor refinisher may have trouble with it, but you can’t leave damaged areas unattended.

Aitor DiagoGetty Images
4. Reduce Dust and Protect Against It
Do everything you can to reduce dust, prevent its migration out of the work area, and protect surroundings from it, Fenollol says. First, shield other parts of the house by hanging plastic sheeting over hallway entrances. If furniture has been moved out of the room you are sanding and staged in a nearby area, throw a clean tarp over it. Hang plastic sheeting over any window that isn’t open.
When sanding, empty the dust bag frequently. Floor sanding machine manufacturers and rental companies advise against letting the bag fill up (which will cause more dust to become airborne); empty the sander’s dust bag when it’s about one-third full.
Finally, reduce airborne dust where you are working.
“A simple way to get some of the sanding dust out of the room is to set a box fan in an open window and blow air out of the room,” Fenollol says.
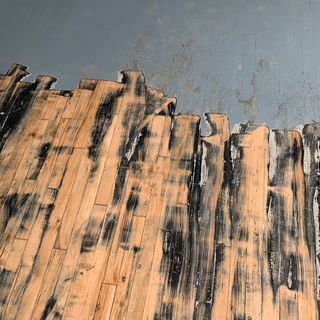
5. Don’t Dig
If there’s one primary rule of floor sanding, here it is: “You’ve got to keep moving,” Fenollol says. “Staying in one spot with the machine will cause it to dig.” People tend to think that because most traditional hardwood floors are ¾ of an inch thick, there’s no need for concern because there’s plenty of wood to work with. “A solid floor is ¾ of an inch thick,” Fenollol says, “but the nails are only 3⁄8 of an inch below that surface, and you can hit them if you’re not careful. You’re going to see sparks. This is going to ruin the belt and will leave a gouge that you’re going to have to work out. Bottom line: Don’t dig.” At most, you want to remove about 3⁄32 of an inch of wood in the refinishing process.
6. Sand in Sequence
Floor sanding is a sequential process whereby the coarse scratches left by the previous grits are erased by the finer scratches of the next grit. Use the grits recommended by the rental center for the equipment you are renting. A typical grit sequence, says Fenollol, may look like 36 grit, followed by 50, then 80 or 100 grit. But that sequence varies depending on whether you will stain the floor before applying the finish, and just how rough the floor was to start with. Furthermore, you may also buff the floor when you are done to blend out all abrasive marks. Finally, not all floor sanding equipment behaves the same with the same grit. There are a variety of machines that abrade floors (belt sander, a rotary sander, a single-pad orbital sander, a three-disc orbital sander, and a buffer) and you would be wise to find out what the rental center offers ahead of time and what they advise in terms of abrasives. The more homework you do before beginning, the more likely you are to end up with a neatly done floor.

mikkelwilliamGetty Images
7. Edge With the Same Grit Sequence
Floor sanders cannot sand up to the floor’s edge or into corners. You do this with a separate machine called an edger. “You’ve got use the same grit progression to match the other machine,” Fenollol says, “otherwise the edged areas will not blend in with the surrounding floor.” If you have trouble using the edger or you can’t get the two surfaces to blend properly, a handheld orbital sander can help blend the edged area into the adjacent floor.
8. Scrape the Corners
No sanding machine, other than a handheld ¼-sheet sander with a square pad, will get into a corner. The solution, says Fenollol, is to use a scraper. This simple handtool is nothing more than a wood or plastic handle with a blade formed from a piece of steel bent at an angle. The end of the blade is beveled at a 45-degree angle. As you pull the blade over the floor, it scrapes the finish and the wood away, leaving a surprisingly smooth surface. “It makes quick work of it,” Fenollol says. But the scraper’s blade dulls quickly. Refresh the edge by filing it with a mill file held at a 45-degree angle. Fenollol advises getting a multi-pack of blades, then quickly changing dulled blades and sharpening the bunch in one batch.
9. Remove Every Speck of Sanding Dust Possible
“You’ve got to vacuum, vacuum, vacuum. You’ve got to get the dust off the floor,” Fenollol says. Dust left on the floor will get trapped in the floor finish, resulting in roughness that will ruin what you set out to achieve. Rent a shop vacuum if you don’t own one. After a thorough vacuuming, go over the floor lightly with a moist (not wet) sponge mop. When the floor is dry, you’re ready for finish.

Sollina ImagesGetty Images
10. Reduce Your Gloss
“High gloss finishes show the most imperfections. What is your house, a museum or something?” Fenollol asks, rhetorically, laughing. High gloss finishes are difficult enough for professionals to apply, let alone a do-it-yourselfer who is probably applying it for the first time. He urges do-it-yourselfers to select a lower sheen finish, at most a semi-gloss, and steers people to water-based finishes, which he deems as easier to apply than traditional oil-based finishes. Also, he says, apply any finish sparingly. “I’d rather put on three or four thin coats than two or three heavy coats.” This is the same advice often given to DIY painters. Thin coats dry more quickly and more evenly than heavy coats, and they are less likely to puddle in low areas.
After all your hard work sanding, cleaning, and finishing, step back and admire the shine of your newly refinished floor.
This content is created and maintained by a third party, and imported onto this page to help users provide their email addresses. You may be able to find more information about this and similar content at piano.io